DIY Embossing

There are a few ways to emboss, some involve metal plates similar to letterpress, and some involve ink, heat, and embossing powder, but the results are essentially the same: adding a raised touch to paper goods, instantly upgrading them from standard to luxurious. 

In this DIY, I'm using a heat embosser to dress up the envelopes for my holiday cards. Read on for details.
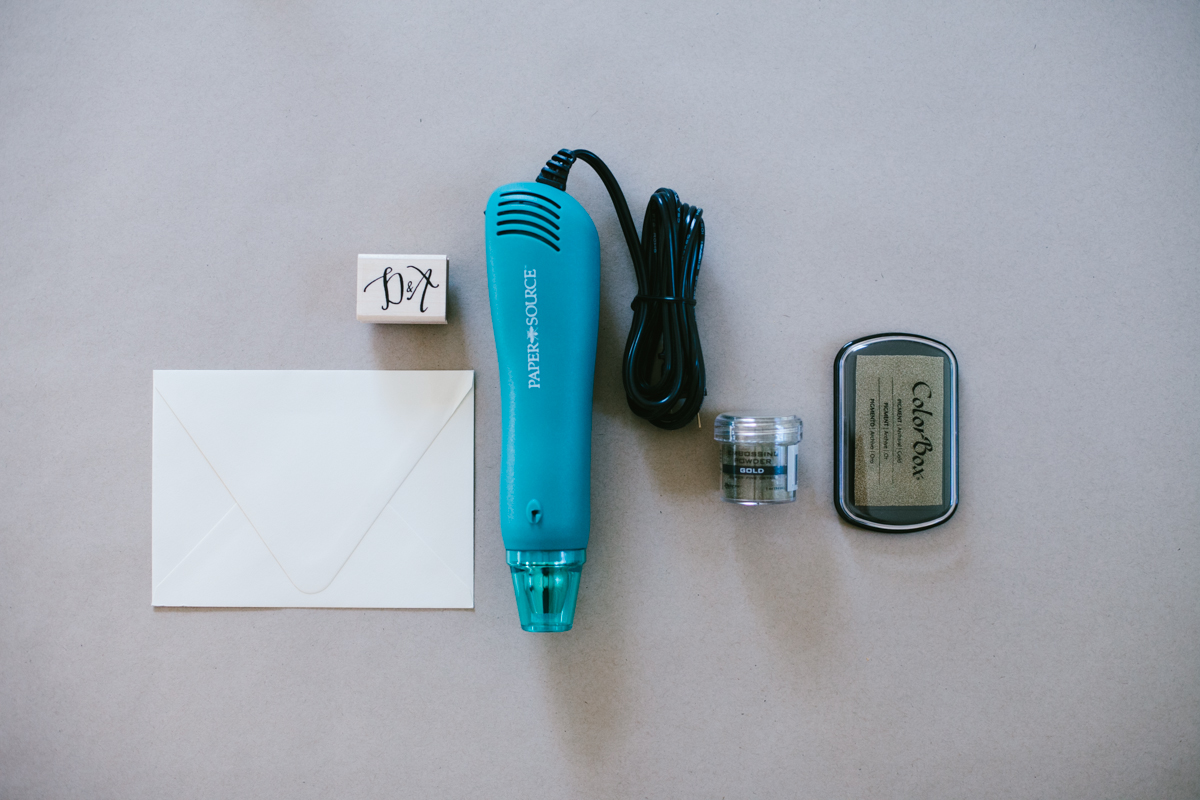
SUPPLIES NEEDED:

-paper or envelope

-stamp (this monogramed one is available in my shop here)

-pigment ink pad (I like Color Box, also it's very important that your stamp pad is PIGMENTED ink, it won't work with other types of ink)

-embossing powder (similar here)

-heat embosser (mine is Paper Source, similar for less here)

STEP 1: Press your stamp into your ink pad. These pigments inks are loaded with ink, and the sponge is soft, so start with a light touch.

(paper makes me happy)

STEP 2: Press your stamp firmly onto your paper or envelope.

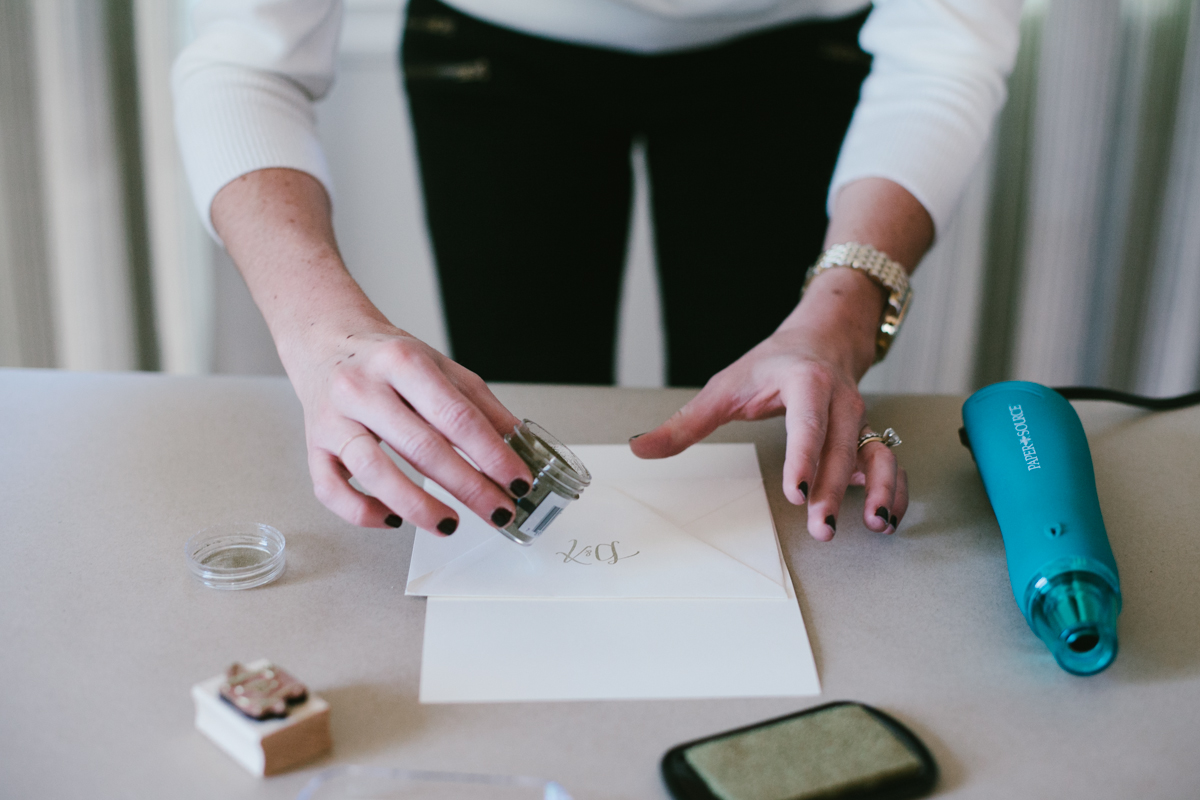
STEP 3: Working quickly, while the ink is still wet, place your envelope over another piece of scratch paper, and shake your embossing powder all over it. Use a generous coat of powder to ensure you've covered your entire stamp, and don't worry about wasting embossing powder, you'll eventually pour the unused portion back into the container.

STEP 4: The powder will have clung to the wet ink, and the rest can be shaken off. Do this while you sing along with Taylor Swift. Make sure you SHAKE SHAKE SHAKE really well :)

STEP 5: Turn on your heat embosser, wait a few seconds for it to warm up, and hold a few inches away from your paper while you melt the embossing powder to the ink. Move the embosser around your design slowly, and you can see the color start to change where it's melted. This gold ink and powder is fabulous that it has a slight sheen to it, almost like a foiling effect, perfect for holiday cards. 

Another tip here: place two heavy books on either side of your paper or envelope to keep the sides from folding up due to heat exposure. 

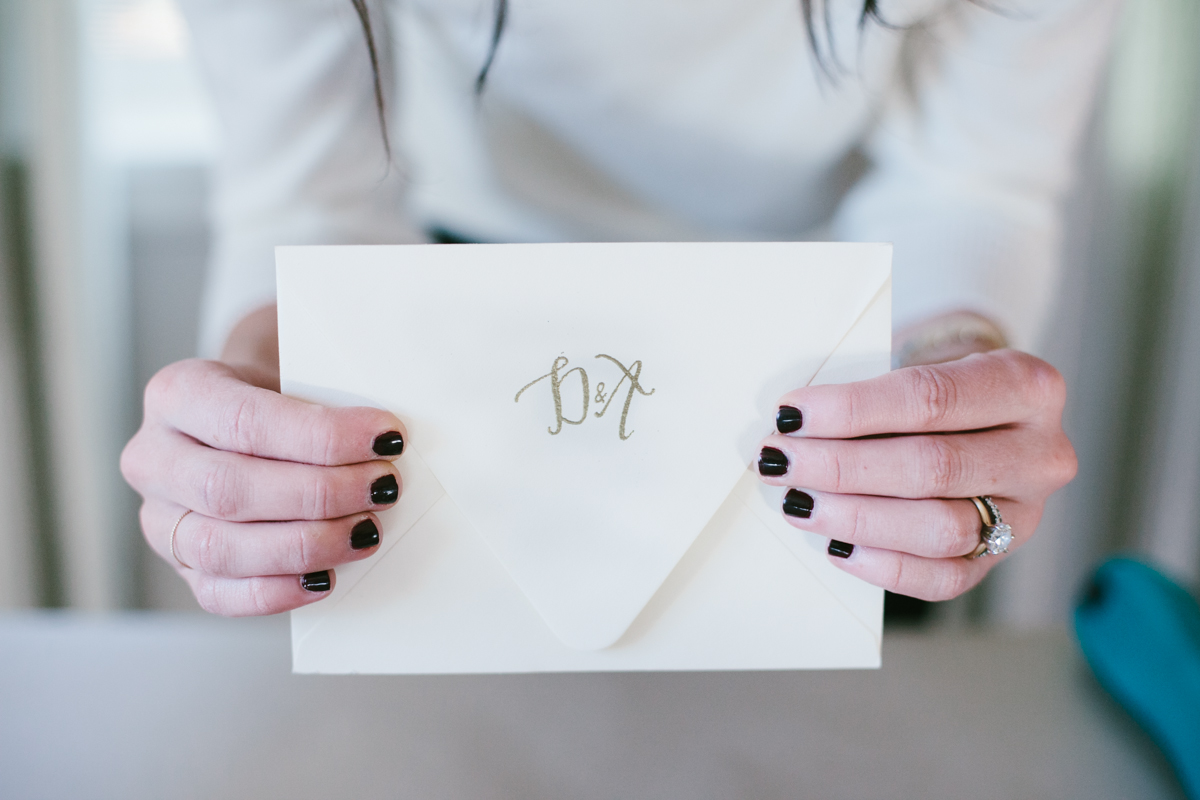
It's finished! Embossing is the most stunning in person, because you can run your finger over the design and feel the difference in textures. I love this technique and am excited to incorporate it on my Christmas envelopes this year.

Have you tried this technique before? Would love to hear your experience!

Photography in this post by Candice Hackett

Some links are affiliate. 

One Simple Trick for Dressing Up Your Holiday Cards

This is the first of many posts to come in a new holiday series here on the blog! I've teamed up with photographer Candice Hackett to bring you all things holiday that I'll be sharing throughout the rest of November and December. I'm so excited to reveal more of what's in store.

I'm starting things off with this simple DIY. I am a big fan of DIY (see exhibit A: our wedding) So naturally, if it's possible to DIY it, chances are I've tried it. I've enjoyed designing our Christmas cards each year, and I print them myself for the most cost-effective method. One trick I've found to making my DIY cards look more professional is with this simple tool:

A corner rounder! (sneak peek at last year's card!)

Paper makes a statement in the details, and I love that this is a quick, simple and easy way to make a big impact. 

I have this corner rounder by Fiskars, and I simply place each of the edges into the slot and press. It cuts my 110 lb heavyweight cardstock easily, and my cards are instantly upgraded.

Do you send holiday cards? If so, do you DIY your cards or order pre-made? Would love to hear about your process!  

photography in this post by Candice Hackett 

My Go-To Party Supplies

I'm in the season of life where there's always lots of reasons to celebrate. Between weddings, babies, and birthdays, there's a lot of events on our calendar. I've thrown my fair share of parties, and I've compiled a list of some items that are my go-to hosting favorites. 

1. Striped Party Straws

This is the best price I've seen (144 for $4.99) and they add a little something extra to any party drink. Perfect in red for the upcoming holiday season. TIP: these can be cut in half for shorter drinks as well, and kids love them too.

2. Gold Washi Tape

Washi tape has so many endless uses, and can be especially helpful at a party. From removable drink labels, to taping photos or decorations on the walls, to creating tiny cake banners or festive flags on stir sicks for drinks, it's a do-it-all item. Stock up in bulk and use it for a variety of things post-party as well.

3. Volcano Candles

Available at Anthropologie, but also on Amazon as well, this candle smells divine, and is the perfect way to scent your home for a gathering. One of my all-time faves, and a thoughtful housewarming gift idea too.

4. Bar Cart

The one we have is from Target, but if I didn't have one already I'd get this one. Antiquey, darling, and the price is hard to beat. Bar carts are so helping for additional serving space at at party. Not just for bar items but also can serve as extra space for appetizers, cards, etc.

5. Mercury glass votives from West Elm

At $5 a pop, these create a warm, inviting look at a great price. I have tons and I place them everywhere to add warmth during winter parties. 

6. Tealights

To fill all those mercury glass vases with!

7. Cake Stands

These are perfect for adding interest and height dimension at a display table. Not just limited to displaying cake, you can stack any food item or really any other item, glassware, napkins, drinks, just about anything you like! The scalloped edge on this one adds just the right amount of detail. 

What are some of your go-to hosting items? I'd love to know!

To note: some links are affiliate.