HOUSE UPDATE 1: DOORS, CABINETS, AND PAINT

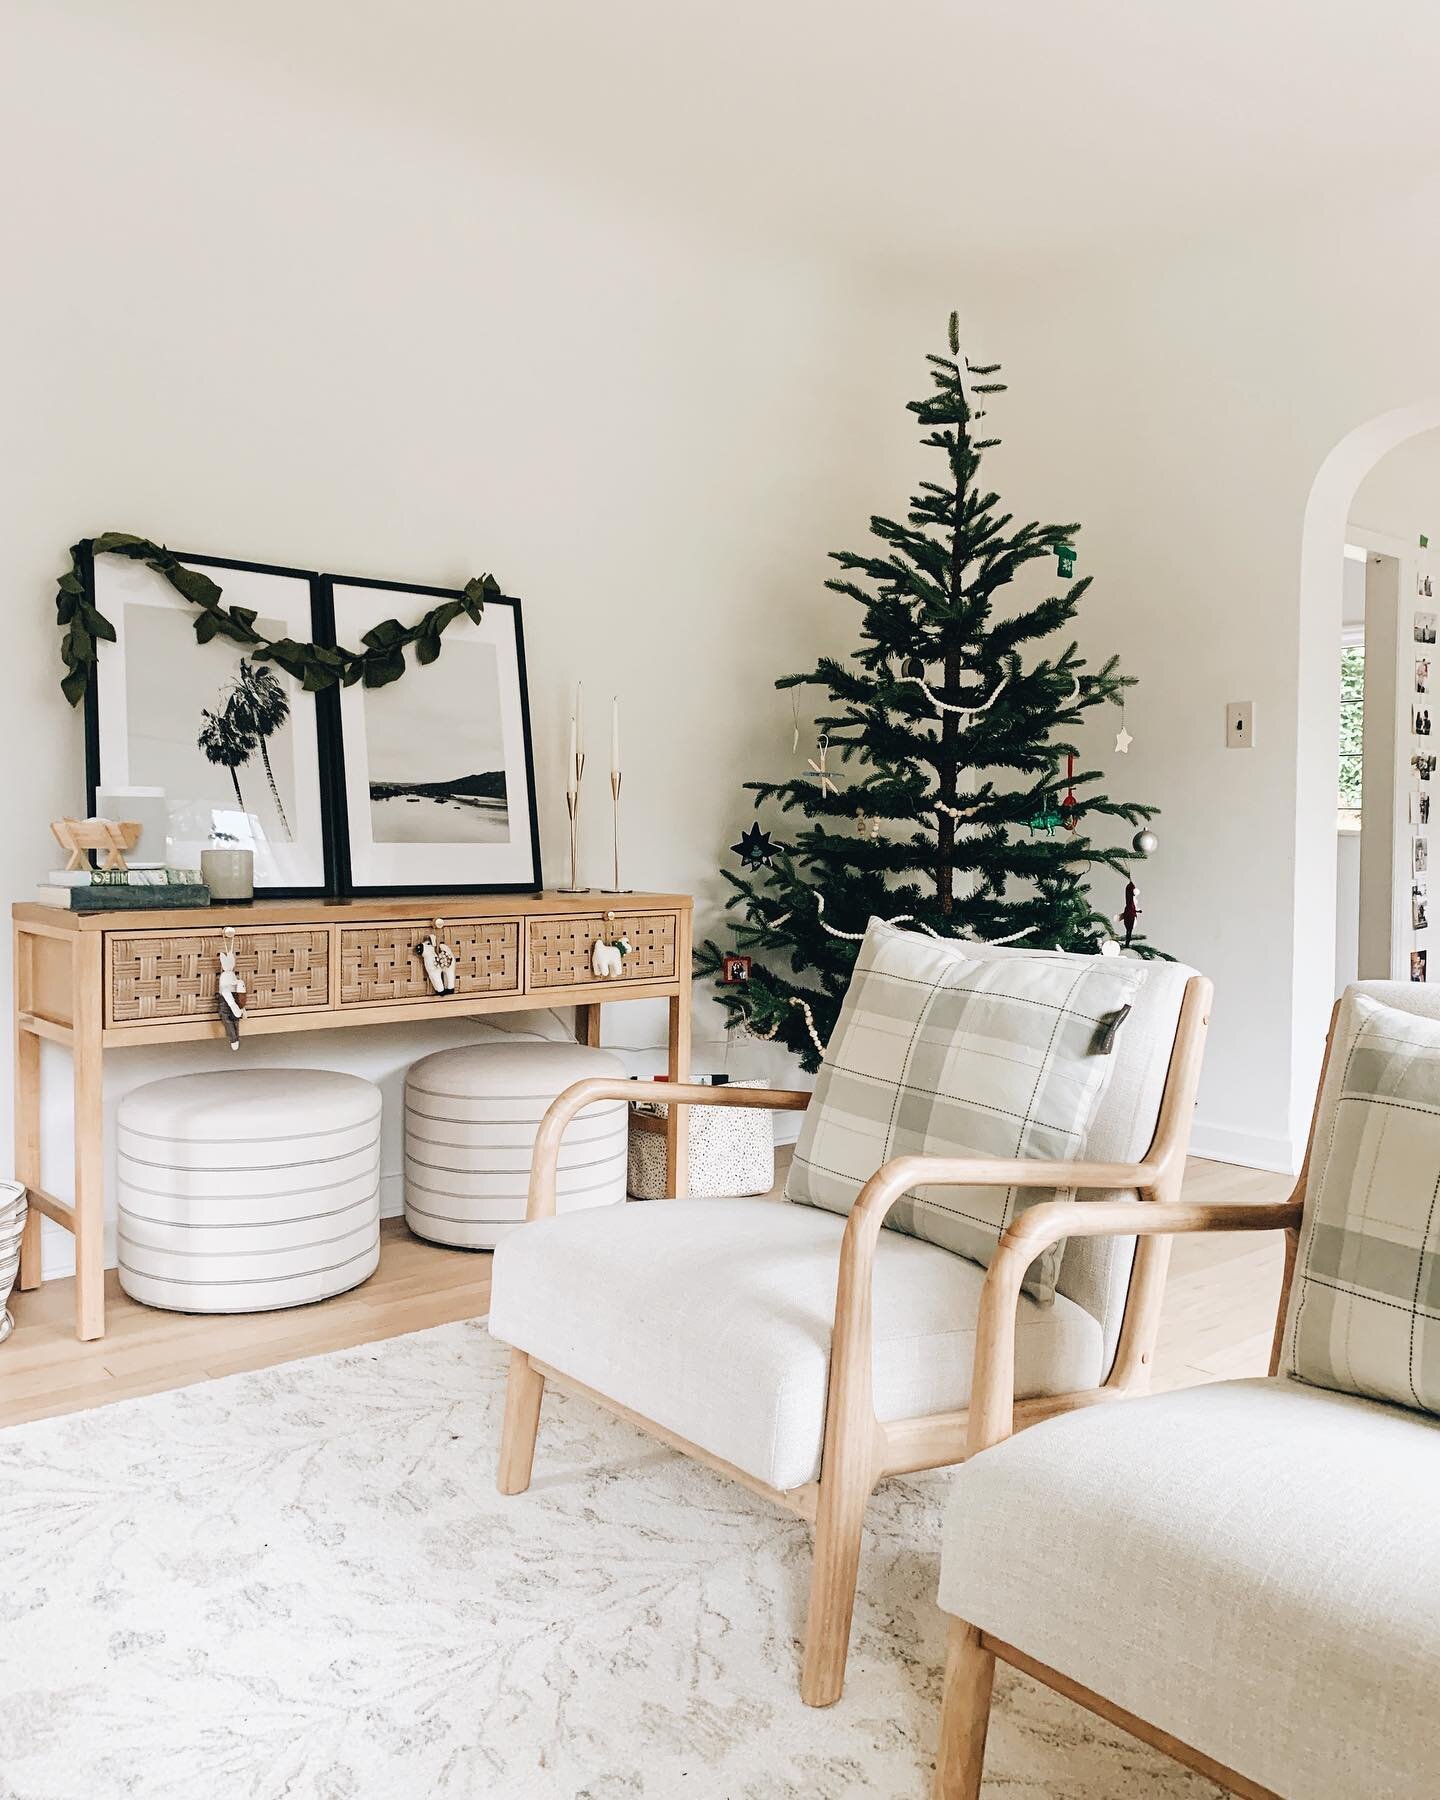
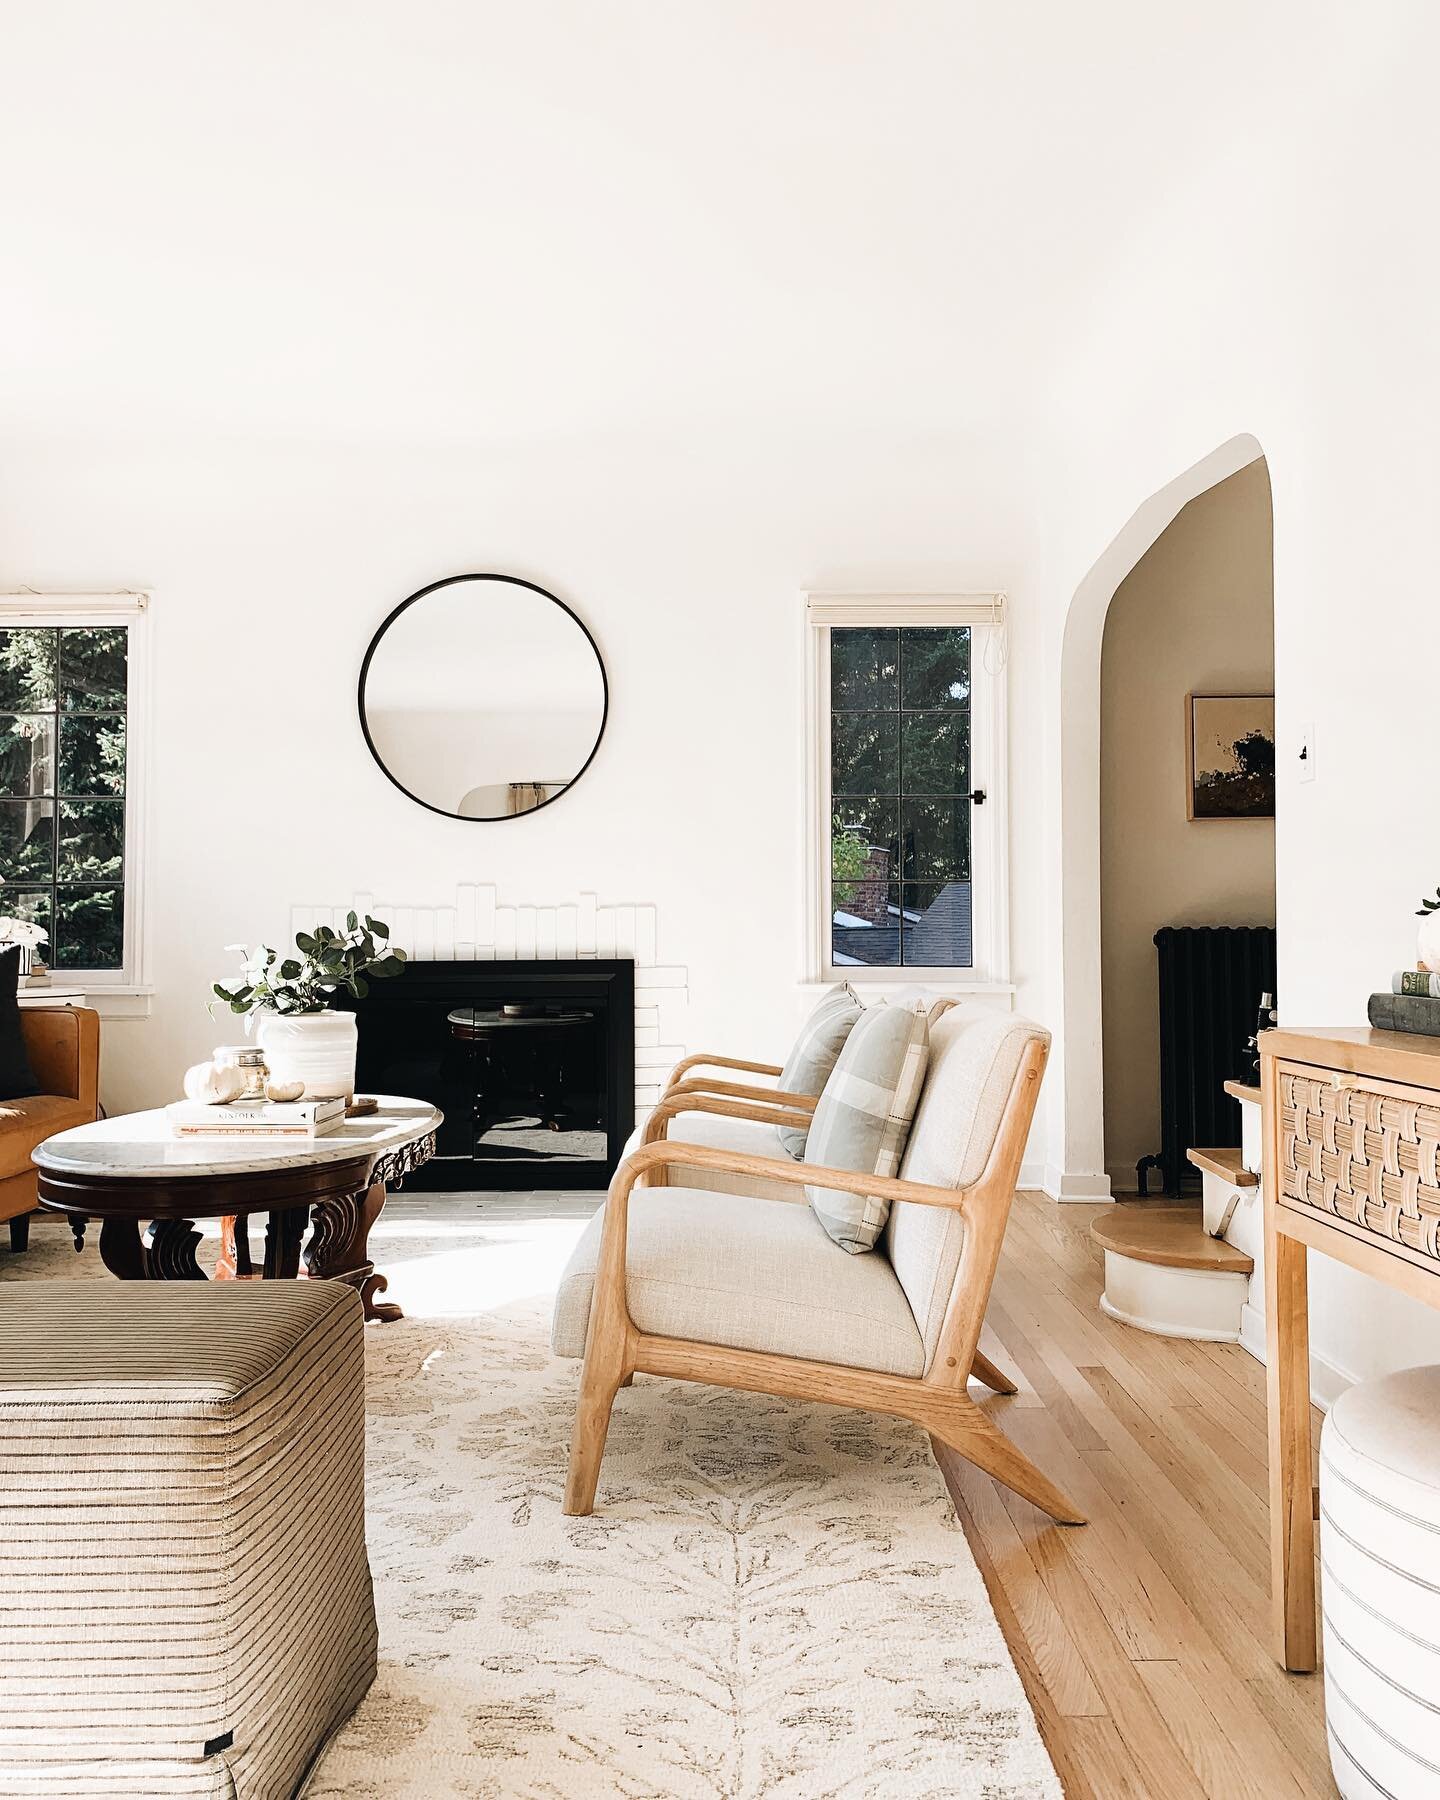
We're knee deep in house updates, and one of the first things we did before we moved in was paint. We painted doors, walls, trim, and kitchen cabinets, and it took us five weeks of evening and weekend work.

The walls were originally a grey-blue. Not bad, but not my favorite. A friend saw it while we were in the process of painting and thought we were crazy to paint it, her house interior was painted that grey-blue, just like nearly every other house in Seattle (and in all honestly it wasn't that bad to begin with) but I wanted it white. It was a good lesson for me, in not listening to the noise or the trends or what your neighbor or your best friend likes, but doing what YOU like. It's your house, and you're the one who will be living in it.

On a similar note of not comparing, my house will not look like the overly-perfectly-styled images I pin because hello, I have a toddler and this is real life. So trying to find the balance of what I like and what is reality for us right now is where I'm at.

About the painting process:

We got lucky, and inherited beautiful, solid wood, heavy, original doors. We loved everything about them except the wood stain and the 90s gold hardware. We switched them out for white with black hardware, and the difference is amazing.

We painted them using this sprayer by Graco. We have a friend who used to be a professional painter and he helped us out with this one, as we were trying out a professional grade sprayer. It's heavy, but easy to use and wow, the effect is stunning. Like factory painted door fronts. I love it and am so glad to have used it.

Prep: we got a powder degreaser (comet is similar), and scrubbed the fronts. We didn't sand them because they were new and had heard from another friend who had just done their cabinets and didn't sand, and we've seen those and they looked great to us so we went for it and were glad we skipped that step.

Since it was wintertime in the pacific northwest, we had to work inside, otherwise we would have done this outside or in a garage. We completely taped off an interior room with dropcloths and set up two sawhorse workstations. (We did have some overspray, so make sure you're in a room where you can easily get that off of surfaces.)

We sprayed cabinets (with hardware removed) in two rows. We'd spray a light coat, turn up the heat, wait 1 hour, spray a second coat, wait 24 hrs, then remove. Some tricks for the sprayer are to: use it far away, use continuous motions, wear a mask, start spraying before you get on to the wood, spray until you're all the way off of it, wear clothes you don't mind getting ruined (because they will), and have a strategy for how you will enter/exit the room. Also pay close attention to cleaning instructions. After each second coat we'd rinse out the paint can and take apart the pieces to wash and dry.

We did all 39 cabinet fronts, from this ikea wood to white, and I like that the fronts have some edge detail to them and aren't just plain.

About the paint:

We like Home Depot for the price, and we color match all the higher-end brands to their Behr interior paint. Our door color is Benjamin Moore Simply White in Behr semi-gloss interior paint. Our trim right now is off the shelf white, which I'm not sure if you can tell from the photos, but is a bit brighter than Simply white and the trim around the doors will be going to Simply White once we find the time, it's not high on our priority list at the moment. Our walls are Farrow and Ball Strong White in Behr eggshell. I love love these whites. The wall color is beautiful, almost a greige. It has quite a bit of color in it for a white which gives it the depth I was looking for. Simply White is a creamy white and we did that on the kitchen cabinets as well as the doors. It contrasts nicely with Strong White.

About the cabinet hardware:

We chose Atlas hardware in Elizabeth in matte black, in a size that would fit our existing pulls so we wouldn't have to deal with drilling new holes. I love this hardware and I think it looks timeless. Kind of like a polished modern farmhouse. We went with them for our house numbers too. Love the look. They have tons of finishes, and for a second there I almost went with the gold, but liked that the black looked a little more industrial/mom of a toddler/work horse kitchen. It suits us.

About the door hardware:

We choose Stone Harbor Hardware in Highland in vintage bronze finish. I love the contrast of the bronze hardware with the white doors. Stone Harbor was so nice to work with, this company will even match an existing key to your new door lock, you can mail it to them and they send it to you ready to go. These knobs are high quality and beautiful, totally recommend. They were so generous to extend a discount code here, use code ALLIES10 for 10% off everything through January 31st.

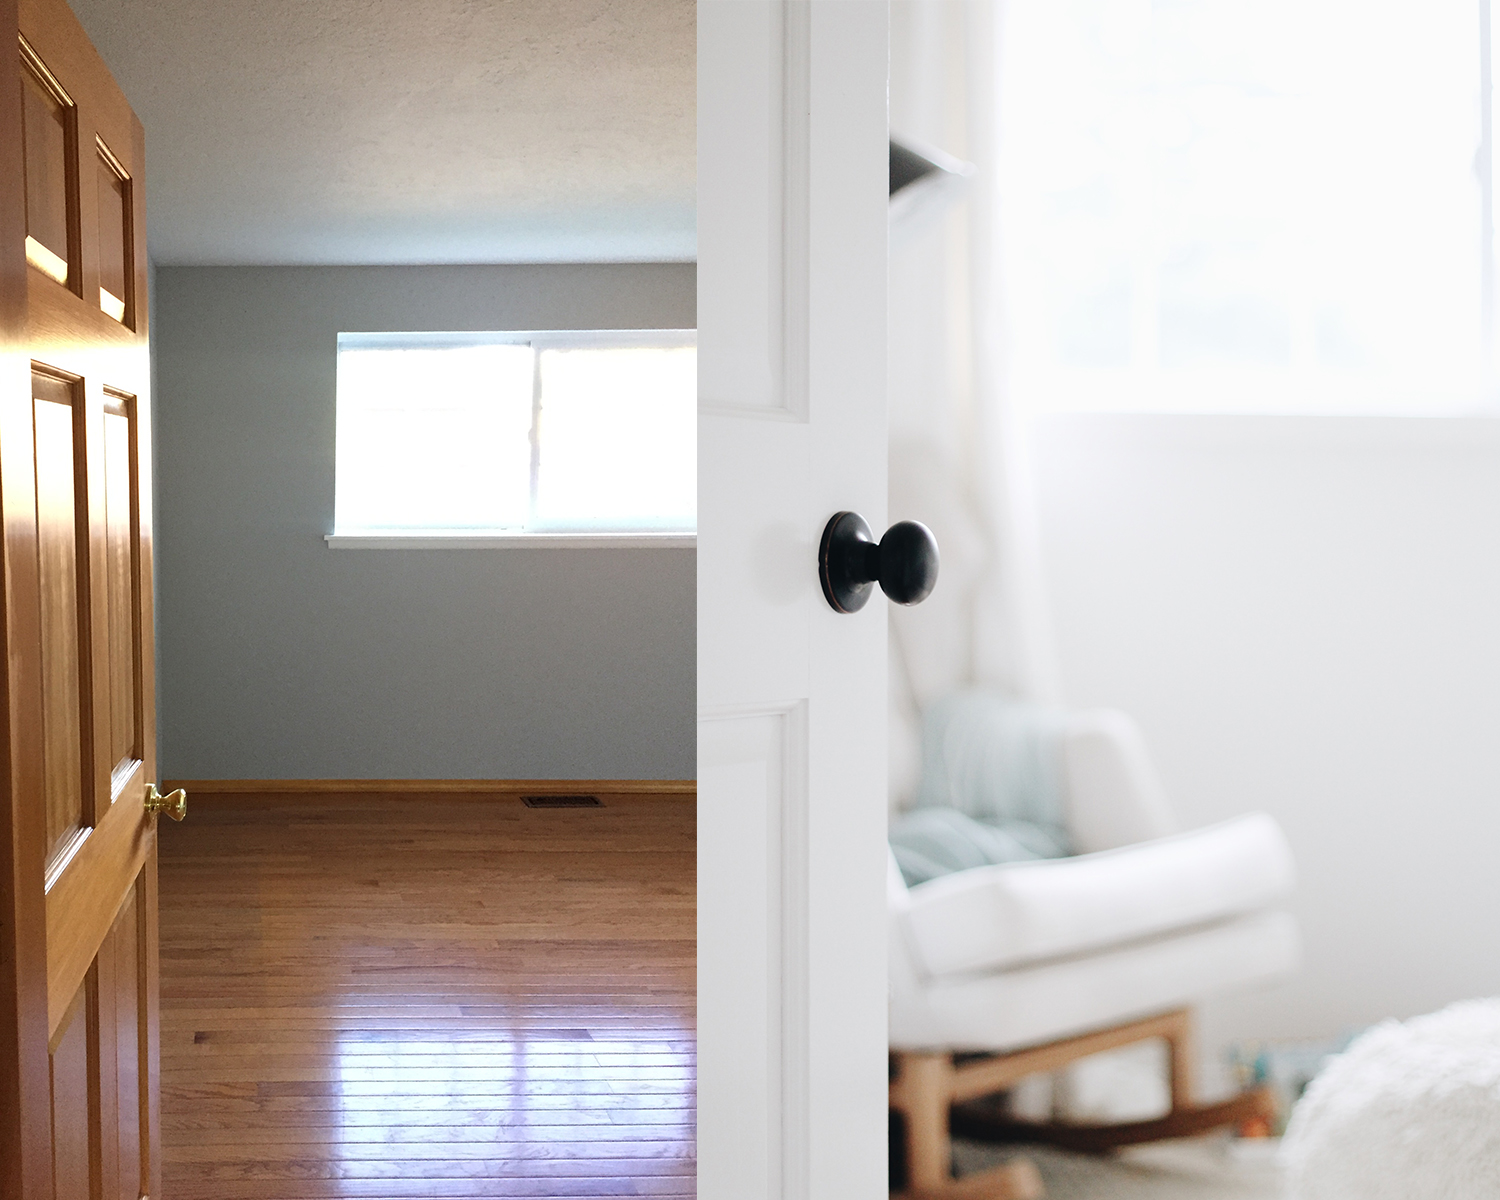
Here's a fun before and after for you. Just paint and hardware updated and look at the difference. Incredible!

Our house numbers got a quick upgrade too. We stuck with matte black and went for a traditional look with these by Atlas.

Once the walls, door, cabinets, and trim were painted, hardware was placed, and doors were hung, we moved in. Now we're onto everything else: lots of decorating to do, light fixtures to switch out, subway tile to place, art to hang, kitchen flooring to plan, and a million other things. Enjoying the messy middle where we're at because as Brené Brown says, that's where the magic happens. Stay tuned!

Thank you to Graco, Atlas, and Stone Harbor for partnering with me on this post.

TODDLER HOLIDAY GIFT GUIDE

A super last minute holiday gift guide, in case you're scrambling for ideas this weekend!

Here are some of our current favorites.

FOR EATING

We have a kid that loves to eat. He yells "spooooon!" whenever he sees one. I wanted to get him some more non-plastic utensils and found these. Love the bright colors and that the handles are large and easy to grip for tiny hands.

We're still figuring out how we'll do kid seating as Trey gets older, debating if we'll keep the high chair or trade it out for a booster seat. I like the idea of us all at the same table and low profile seating, so we're giving this one a try.

Trey is always requesting more water. Water bottles we like here here and here.

FOR TRAVEL

His own luggage! He's into pushing kid-sized shopping carts and I bet he'd love to put this through the airport when we travel a couple of times next year.

Kids tablet for road trips and plane flights.

FOR PLAY

This play kitchen gets tons of use around here.

This car is kind of obnoxious in color but is always a big hit at playgrounds.

A wooden train set is always classic at Christmas.

For toddlers who love to put things into shopping carts: this.

Merry Christmas!

HOW TO DE-STRESS YOUR HOLIDAY CARDS

Thank you to Minted, the maker of modern and beautiful holiday cards, for partnering with me on this post.

The Christmas season is upon us! It’s the most wonderful time of the year, and also, sometimes, the most stressful. The shopping, the cooking, the baking, the cleaning, the partying, it is a FULL season, and while it’s a good one, it easily becomes a little crazy.

I think part of it is sometimes, that everything labeled “Christmas” can be hyped. From gift-giving to baking to holiday party outfits, sometimes in the middle of trying to make everything more magical what we really do is make everything more stressful. I want to recognize this, but not live into it. I want to have a simple Christmas, not a buying frenzy or a perfect gift hunt or a fit-everything-we-can-into-these-four-weeks experience.

Our families are awesome, and one way that we’ve all decided to simplify Christmas is by drawing names on both sides, so that we’re each giving to only one person in each of our families. Doing this has saved so much time, energy, and stress, and I really enjoy it.  If we do something extra for the grandparents I like to do photo gifts that are simple and meaningful, like calendars or books of highlights from the year.

But there are some things that we feel we have to do (or choose to do) in this season. Like the Christmas card. This process alone is enough to stress someone out. I don’t know what it is about them, but I think there’s this pressure to get THE most perfect photo of all time. Like we need to prove to the world our family is WITH IT. Like, “Look! We’re all smiling! We’re all happy, well rested, highly capable people who never have a bad hair day or have to wait in long lines at the post office or arrive late to church every.single.time and for the life, can never, ever, seem to find the missing shoe?”

Do you resonate with this? That struggle to get the perfect photo is real. As a semi-professional photographer and designer, I get it. Photos are important to me. I treasure them, print them, save them, post them, enjoy them, and yes, photo quality is more important to me than the average person.  BUT. Just because you’re into high quality photos doesn’t mean you need to hire an expensive photographer to get them. Our Christmas card photos this year were all taken on self-timer, and they are some of my favorite photos of our family, ever. Here’s how I did it:

By some Christmas miracle, we got an early snow this year in October. I know how magical of a backdrop this makes, so I bundled everyone up and out we went. It was not fancy or glamorous - we just pulled over on the side of the road near a local park, and I set up the camera and told Daniel where to stand with Trey. I have this DSLR camera, this lens, and a tripod (similar) that I use for self-timer photos. I pressed the “10 second continuous timer" button, ran for it, and hoped for the best. This one took only 5 takes which is completely miraculous with small children.

Once we had the photo, it was onto the card. This year I worked with Minted, which I love for their wide selection of designs and their printed recipient addressing. I'm so thrilled with how these turned out. They were exactly the kind of card I was looking for - modern and simple, and festive, and even though I say this every year, they’re my favorite cards we’ve sent to date.  

Trey "helped" me stuff the envelopes. Excited to incorporate him more into our families traditions in the next couple of years. Some of our other favorite (simple) holiday traditions include: seeing Santa (it did not go well this year but we did it), walking through Candy Cane Lane (an area of houses decorated in vintage Christmas decor with lights and music; it’s very It’s a Small World-esq.), buying a Christmas tree (we did the closest lot this year instead of the farm because #movingiscrazy), and reading the Christmas story (we like this one for kids). We're already two weeks into it but in the future I'd love to do some kind of advent calendar, and also somehow incorporating doing something for someone else in need, because I think that’s the true spirit of Christmas - bringing hope and light to the world during one of the darkest times. I want my family to think of Christmas as a time of giving, instead of getting, because that’s where the lasting joy is.

What are some of your favorite family traditions and how do you keep your Christmas simple? Would love to hear.